
- why-build-a-diy-camping-shower
- choosing-the-right-type-of-diy-camping-shower
- materials-and-tools-youll-need
- step-by-step-how-to-build-a-diy-camping-shower
- real-user-tips-and-problems-to-avoid
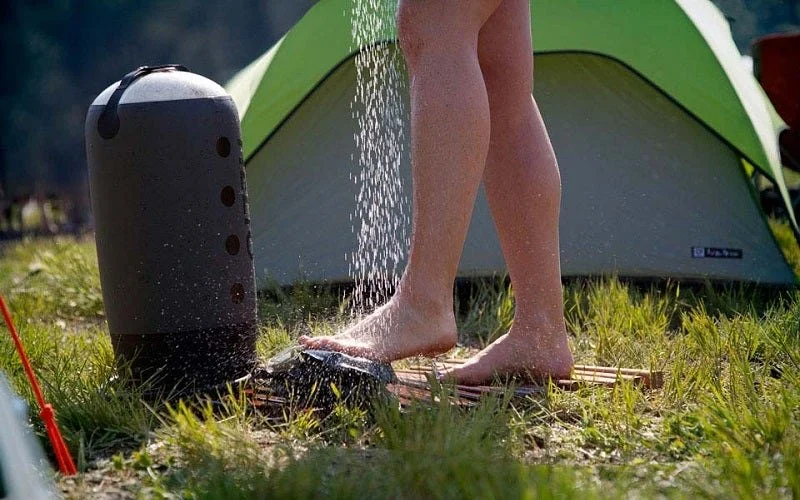
1. Why Build a DIY Camping Shower?
If you’ve ever returned to your campsite after a long hike, sweaty, dusty, and sticky—then you already know the answer. Learning how to build a DIY camping shower transforms your camping experience from rugged survival to a touch of civilized comfort.
While some campgrounds have facilities, many do not. Whether you're off-grid in the Highlands or posted at a festival for days, a portable shower system gives you hygiene freedom. Not to mention, it can double as a dishwashing or gear-cleaning station.
At Camp Spotter, we’ve seen thousands of outdoor enthusiasts discover how a homemade shower setup not only improves comfort but also encourages longer, more enjoyable stays in nature.
2. Choosing the Right Type of DIY Camping Shower
Before you build, consider where, how often, and how long you'll be using your shower. This determines what kind of setup you need—and how complex it should be.
2.1 Gravity-Fed Showers
Ideal for minimalist campers, gravity-fed showers use a water bag suspended from a tree or frame. Water flows through a hose and nozzle thanks to gravity alone. Simple, lightweight, and no electricity needed.
2.2 Pressurized Pump Showers
For a bit more pressure and control, pump-style systems are great. Using a foot pump or hand lever, you create water pressure manually. These are excellent for rinsing off saltwater, mud, or sandy feet.
2.3 Battery or Solar-Heated Showers
For the full spa treatment, go electric or solar. Some DIYers repurpose solar garden pumps or 12V RV water systems for off-grid luxury. If you’re staying in one location for multiple days, solar bags can give you pleasantly warm showers by sunset.
3. Materials and Tools You’ll Need
Building your own shower doesn't have to break the bank. Many setups cost less than £30 if you get creative with parts from home or local hardware shops.
3.1 Basic Supplies
You’ll typically need:- A water container (5–10L jug or collapsible water bag)- Hose tubing (silicone or food-grade plastic)- Showerhead attachment (or repurposed watering wand)- Optional: Foot pump or pressurizer bulb- Waterproof tarp or privacy tent
3.2 Tools to Have on Hand
Depending on your design, tools like scissors, zip ties, carabiners, duct tape, a small drill, or PVC connectors may be helpful. Don’t forget a simple hook or hanging solution to suspend your water container.
For hard-to-find parts and tested camping accessories, Camp Spotter offers a curated selection specifically for DIY outdoor setups.
4. Step-by-Step: How to Build a DIY Camping Shower
Let’s walk through building a gravity-fed system, which is the most beginner-friendly design.
4.1 Step 1: Prepare the Water Source
Use a clean jerry can or collapsible bag. If you want warm water, leave it in the sun for a few hours before use. Make sure it has a strong handle or cap that can support its full weight when hung.
4.2 Step 2: Connect the Hose
Attach a hose to the outlet of the water container. If the container doesn’t have a spout, drill a small hole near the bottom and install a valve with a seal. Clamp the hose securely.
4.3 Step 3: Attach a Showerhead
Install a showerhead or nozzle at the end of the hose. Garden nozzles with flow control work well. Make sure the connection is watertight to avoid waste or leaks.
4.4 Step 4: Hang and Use
Hang the container at least 2 meters above the ground using a tree branch, pole, or tripod. Step under, twist the nozzle, and enjoy! For privacy, zip a tarp between trees or set up a pop-up shower tent.
5. Real User Tips and Problems to Avoid
Cameron, a camper from Devon, built a DIY shower using a black water bag and found that it got too hot in full sun. “It was like lava by the time I used it. Now I half-fill it and top up with cooler water,” he said.
Another tip comes from Lucy, who converted a foot-pump sprayer into a mobile shower. “It worked brilliantly for rinsing sandy legs at the beach. I even use it to clean my dog,” she shared.
5.1 Avoid Overcomplicating It
Stick to basic components for your first try. The more moving parts, the more that can fail—especially in a remote area. Focus on function over perfection.
5.2 Test It Before You Camp
Don’t wait until you’re off-grid to find out your nozzle leaks or your hose doesn’t reach. Do a dry run in your garden or garage.
Ready to level up your outdoor hygiene game? Camp Spotter offers quality-tested items perfect for building your own reliable, camp-friendly shower system.


 Knollwood Estates Mobile Home4.0 (47 reviews)
 Friendly Lane MHP3.0 (27 reviews)
 Culver City Terrace4.0 (24 reviews)
 Sterling Manufactured Home Community3.0 (124 reviews)
 Mussigbrod Campground3.0 (11 reviews)
 Prairie Oasis RV Park4.0 (500 reviews)
 How to Prepare for Nighttime Wildlife Sounds and Activities
 How to Cook Stew Over a Campfire
 Best Campfire Songs for Group Sing-Alongs – Top Picks for Your Next Adventure
 Best Campfire Snacks for Nighttime Enjoyment: Delicious Ideas for Your Next Camping Trip
 How to Build a Safe and Cozy Campfire Ring for Your Outdoor Adventures
 How to Keep Food Fresh While Camping in Summer: Essential Tips for Your Trip